Thursday, 31 October 2013

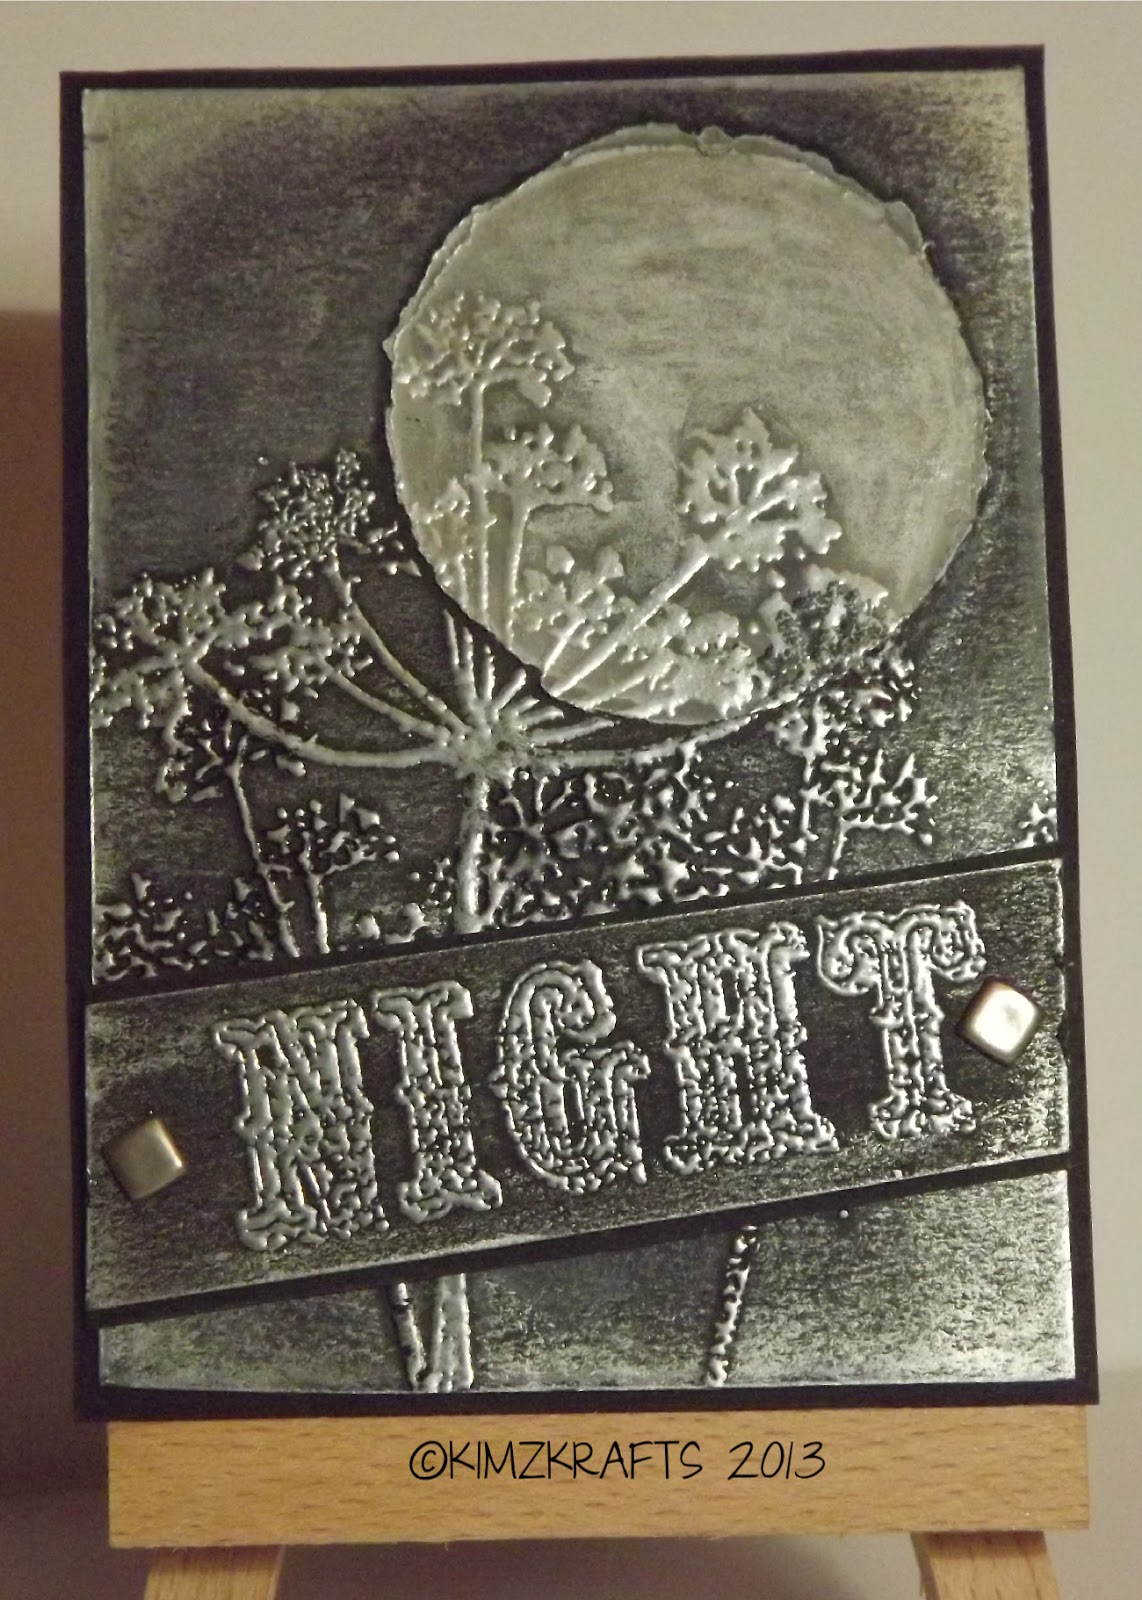
FUN WITH ATC's - Challenge #99 - NIGHT

I thought I would leave this blog until tonight HALLOWEEN but I made this ATC a few days ago. It is for the Fun with ATC's challenge which this time has the theme NIGHT.


I used one of my favourite stamps in one of my favourite ways, a silhouette against a moon!! Anyway, I used 2 roughly cut circles of tracing paper for the moon. I like the rough edges and the layers.  I stamped onto the black card with clear embossing medium and used a silver pearl, a hematite, and a black embossing powder on each of the images.  This worked well but when I started to use some gilding wax around the edges I thought I would add a little to the embossed seed heads as well. 

I used the NIGHT part of a Christmas stamp, SILENT NIGHT, as a banner across the bottom held on with 2 lovely square metal brads.

Pop over to the challenge blog and see the other entries and the lovely DT examples. Have a go yourself!

Need to keep it short as I have some haunting to do!

See you all on the other side of midnight!

Kim xxx

Friday, 25 October 2013

SHEENA ON TV MONDAY 28TH OCTOBER

As the title of this blog suggests the lovely Sheena Douglass is back on our screens again this coming Monday! With her batteries recharged after a well deserved holiday Sheena is going to be demonstrating and chatting all the way through the 9am and 2pm shows! I wonder who the presenters are going to be?

What products are going to be on the shows I hear you ask? Well, it features the beautiful Oriental range launched a few weeks ago. You know the one with the fantastic paper pack and the lovely embossing folders? 

If you remember back that far I made a little 'silver' box as a sample for the shows which one of the presenters, Nigel May, enthused over so much I felt I had to make him his very own box. There was a risk of him 'borrowing' the sample! He tells me he keeps his studio ear piece in it! 

My TV sample

The Nigel May Box
Anyway, while Sheena was away (probably enjoying herself far too much!!)  I felt the need to create a card to surprise her with on her return. And here it is....................


It uses my Zig-Zaggy Fold card base and some of the Oriental stamps from the Silhouettes and Sakura plates. The card I used has a sort of elephant skin texture to it, I have had it for ages and as I am trying not to buy any more stuff (like that is going to happen!)  I thought I would use it. You could get a similar effect by using the crackle stamp from the Ageing Beautifully stamp plate. If you stamp and clear emboss it onto the base card the distressing ink you apply around the edges will be resisted and leave fine lines in the colour of your card. I also masked a moon behind the birds on one of the panels. I find that more than one moon on any project, even if it is a patchwork piece like this, tends to 'mess with your mind' a little! 

What I like about the Zig-Zaggy Fold card is not only is it a great way of using up your precious scraps of card/paper, (you know the little bits that we crafters keep 'just in case') it is also a great way of using some of the smaller stamps to create a large card without the end result looking over fussy. Those little borders between the images make it look like a well displayed art gallery.

Well, there we are. What was meant to be a quick blog to tell you about the forthcoming Sheena Show on Create and Craft has turned into a rather long piece! Hope you are still with me on this one?

Tune in to Create and Craft TV  for some great demos, a lot of Sheena chat, and maybe even a few Halloween bargains! 

Have a lovely weekend! Kim xx

PS Comments always welcome! x


Wednesday, 23 October 2013

TWINCHIE ALERT - #7 DOODLING

My other quick make today is a Twinchie for the Twinchies Challenge. The theme this week is 'Do Some Doodling'. The invitation went out and I accepted! This is what I came up with.


A couple of simple die cut flowers which I doodled on. Now I am an old hand at this doodling game, I was doodling full sheets of A4 long before the internet was even heard of! Have a look HERE and see what I mean. 

Why not pop along to the Twinchies blog page and look at the other examples, Better still have a go at one yourself. We all love a Twinchie!

Thanks for coming over. Please leave a comment, I love reading them.

Happy crafting! Kim xxx

CATS - KATZEN - MOO MANIA #47


Yippeeeeee! It is Moo Mania day again already. 

 I just L O V E this challenge. 

As the title suggests it is all about cats this time. I don't have many cat stamps but I recently bought a magazine with a free set of cat/dog stamps on and what do you know? They are just the right size to fit on a Moo. Well, almost!

Those of you that also bought the magazine will probably notice that I have cut the party hats off the heads of the cats! Rest assured it didn't hurt them one little bit! To be honest the hats made the cats toooo big to fit on the Moo so they had to go. To make up to the cats for the loss of their party hats I gave them some lovely 'nearly real' black whiskers. (The paper ones also got chopped off in the process of cutting out the heads!!!)


The usual fussy cutting and 3D glue gel are in evidence but rather unusually for me the Moo is in landscape orientation. The cats are coloured with H2Os and the background is stamped with grasses and leaves.

Hope you like my cute cats? They all look like they are sat waiting for their dinner! 

Go see the other entries into the challenge and check out the DT samples over at Moo Mania. Why not have a go yourself?

Thanks for dropping by. Please be kind enough to leave a comment for me, I love reading your views.

Happy Moo-ing!  Kim xx


Monday, 21 October 2013

TWINCHIE - #6 THINK PINK

Hello followers! Been a while so I felt I needed to pop in and see you.

I would like to show you my Twinchie for the Twinchies Challenge Blog which this time has the theme PINK. I admit that pink is not my favourite colour. When somebody says the word PINK to me I instantly think of pastel pink, sugar icing, baby booties, cute teddies, marshmallows and such like. Of course PINK can be neon, magenta, fuchsia, really quite vibrant colours and not just those sugary pale tones. 

With my misconceptions banished I created this little Twinchie with some bits and bobs I had lying around. I am currently looking at using up all my little scraps so I can create more space for new things! Twinchies are the ideal way of giving life to a tiny piece of paper, or a single embellishment. 

Here it is then, a symphony in pink. I started with a piece of paper which I had printed using my Gelli plate. Can't really see the pattern but I know it is there!  Then the black image is part of a home cut rubber stamp. You may recognise it from an earlier project. The ribbon was a teeny piece I had kept, and probably from a commercial item (I salvage way too much!), the heart was a failed attempt at colouring a plain wood piece deep red for a Valentines day card. And just how many faux gems I have is quite scary!! 


So there we have it, a PINK Twinchie. Why not pop over to the challenge blog and see the other projects? Why not have a go yourself? Twinchies are great for that moment when you know you want to create something but you don't have much time. 

Let me know what you think. I love getting your comments.

Happy Twinchie Making.

Kim xx

Monday, 14 October 2013

HOW 2 - The Foldy-Zig-Zaggy Card

A new venture for me! 

Told you I flit around from one thing to another.

So in an attempt to keep me 'fresh' (or maybe wake me up a bit!) I have decided to do a full-on tutorial for my folded zig-zag card which featured in the recent Sheena Douglass show on Create & Craft and which several of you have asked me about. So here goes!


You will need 2 pieces of card, 1 x A4 and 1 x A5.


1. Starting with the A4 piece of card, cut it down to 25cm. Keeping the card in a landscape orientation and working on the back measure from the left edge 12cm and 24cm. Score down the lines A + B. (fig.1)

fig.1


2. Measure from the left edge 6cm and 18cm, points A + B, and mark lightly with a pencil. Do not score yet. (fig.2)
fig.2


3. Measure from the top down these lines 7cm, points A + B,  and up from the bottom on these line 7cm, points C + D. Measuring from top and bottom like this takes into account any slight differences in width of the original A4 card and ensures the top and the bottom panel are equal in size. Join point A with B, and point C with D. ( fig.3)

fig.3


4. Cut carefully, best to use a craft knife and metal ruler, between A + B and again between C + D. (fig.4)
fig.4


5. Score down the lines marked at 6cm and 18cm but only to the point where the cut starts. Stop the score at points A,B,C + D as in fig.5.  Not scoring all the way down these lines gives a better look to the finished card and also adds strength.

fig.5


6. Start folding the card. Take the centre panel and bring the fold towards you. Push the top and bottom folds backwards. Bring the long panels at either side together. Run a bone folder along all the folds to 'educate' the card to always fold the way it needs to. (fig.6)


fig.6


7. All this has been happening with the back of the card towards you. Now take the card and flip it over so that the extra 1cm is now on the left and pointing backwards. The top and bottom panels are forward and the centre panel is pushed backwards. This gives you a great place to hang something! (fig.7)


fig.7


8. Now, stick the piece of A5 card onto the 1cm strip. (fig.8 + fig.9)


fig.8
9. It is vital to line everything up before sticking down. Obviously any small overhangs can be trimmed along the top and bottom edges.


fig.9

10. Trim away the excess card from the A5 front panel taking care not to cut into the fold of the centre panel. (fig.10)


fig.10

11. And there we have it! A lovely zig-zag card ready to decorate. You could try varying the depth of the top and bottom panels. All this involves is changing the measurements at step 3.


The Completed Card - Naked and needing Decorating!


I hope that you have enjoyed this step-by-step. I have read it through several times and naturally I have been very careful to make it easily understood. I cannot be held responsible for any failed attempts at making this card, but I will make any changes to the method if you find an error and you inform me about it.

I will go now and decorate my own card, the one I photographed in the making of this guide and upload a photo when it is done.

Have fun experimenting with different card types, patterned card, and go to won decorating your project!

Show me your projects by adding a link to your blog in the comments. I would love to see what you have created!

Thanks for being here, your comments are always read and I will get back to you asap if you have any questions.

Kim xxx
Friday, 11 October 2013

Quick Shout Out - Sheena Douglass on TV Again

Hello followers! 

Just a quick heads up to let you know that the amazing Sheena Douglass is on your screens again on Saturday 12th October on Create and Craft  Sky 671, Freeview 36, Freesat 813, Virgin 748, as well as being available on the Internet, and Apps. There really is no excuse for missing these shows. 

Tune in to see some awesome demonstrations and listen to some great chat about crafting but be prepared for some ad hoc humor too!


Sheena will be featuring some great products as always. Look out for one of my favourite stamp plates, 'Sheltering Tree' which I used on one of the cards I made for the 'Little bit Oriental' launch.


Right, must dash, I am 'THIS' close to getting my craft room back in working order and I simply must have a play with a new product that has literally just come through the letter box! 

Don't forget, I am more than happy to answer any questions you may have about my work and I will always pass on any comments or questions you have to Sheena about all things Sheena related!

Laters friends!

Kim xx


Wednesday, 9 October 2013

FUN WITH ATC - #98 - 3 STAMPS

Hello! My has it been a busy few days. Craft room tidy up nearly at an end, thank goodness! I am starting to get withdrawal symptoms from not actually crafting!

Fun with ATCs has a new challenge today, the theme is 3 Stamps. I did think about being very literal with my choice of stamps by using 3 stamps of stamps but felt that this would be too simple. So I set about looking through my stamp library and got stuck in the section featuring Travel elements (do you think I need a holiday?) 

I wasn't sure what colour inks to use but I knew that I wanted to use some brown card stock. Now that is a laugh because the card I used was rescued from the recycling bin as I couldn't get to my 'card stock' due to the upheaval!! 

Now I may have broken the rule slightly but I actually used 4 different stamps. There are the 3 obvious feature stamps; the ticket, the time table and the stamps, but I also used the corner stamp from Ageing Beautifully by Sheena Douglass to mess up the corners of the base card a bit. Because I had come across a box of hitherto forgotten embellishments I felt duty bound to use them to add more interest. 


And there we have it! An ATC featuring 3 stamps.  Hope you like it? Why not head over to the Fun with ATCs blog and see all the DT samples and the other entries? Why not have a go yourself?

One more day should see the craft room back to full working order. I just hope that I can find everything!!

It would be nice now that you are here to leave me a comment, I love reading them.

Kim xxxx

MOO MANIA - #46 EYES

At last! Another Moo Mania challenge. I have to say that I really look  forward to these challenges, perhaps a little too much!

This time the challenge theme is EYES/AUGEN. It took me a little longer than normal to find a stamp because I am currently, some would say foolishly, having a clear out of my craft room. I am trying to slim it down but without much success! How many times can you bring something back out of the recycling box? I swear that some of the things that I put in the bin had a homing instinct!

So with all the non-craft related work I have been doing these past couple of days I needed to treat myself. Thankfully Moo Mania came to the rescue! Here is my piece for the challenge. Using a lovely Paper Artsy stamp, some vivid paper, a carefully edited sentiment and a gem I made this Moo. Of course it has dimension, would I Moo without adding some 3D elements? Quite frankly 'No'.


Why not head over to the Moo Mania blog and see the DT samples, get inspired and have a go yourself. Check out the other entries as they are uploaded.

Hope you like my Moo. I look forward to reading your comments!

Kim xxx

Wednesday, 2 October 2013

Twinchies Challenge - Halloween

As we enter October the shops are starting to fill up with plastic skulls, rubber spiders, bright orange pumpkins and witches hats.

Yep, good old Halloween. As a child Halloween was barely mentioned but now it is another one of those 'celebrations' (and I use that word with caution!) where we simply must get into the spirit (hahaha!) of things and adorn our houses and children with ghoulish things. 

I enjoy an excuse for a get-together, especially one that involves a theme. So I will be putting on my wart-riddled rubber nose, popping in my false teeth, and dusting off my broom along with the rest of you. 

With that in mind I simply had to take part in the 'Show us your Twinchies' challenge this week as the theme is, of all things, Halloween. Love the planning there DT. 


I actually don't own any typically Halloween stamps, and so I have created a spooky little Twinchie featuring the bird silhouette from the Sheena Douglass stamp set 'A Little bit Oriental' which was launched last month. It can work in lots of ways. In this Twinchie I see it as a bit Edgar Allan Poe/Raven or even Hitchcock/The Birds so in keeping with the spooky theme. The colours represent pumpkin orange and bobbing apple red with a crisp white moon and black gates. All very much in the right direction I think you will agree.

As always, I welcome your comments. Why not head over to the blog and look at the DT samples and all the other entries as they are uploaded and maybe even have a go yourself!

Kim xx

Lavinia Challenge - #8 Autumn Colours

Another month has simply flown by! All around me I see the trees turning a lovely golden brown colour and I guess this sign that Autumn is on its' way could not simply be allowed to arrive without being recognised with a Autumn theme challenge. All down our avenue the conkers are growing and school children are carrying out the annual 'How many conkers can I get in my pocket on the way to school' ritual! Nice sunny day today and I have spent a little time in the garden preparing some of my plants for the winter. Pottering in the garden helps me think and I have been busy planning what I should make for the Lavinia Challenge this month.

Sometimes it is simply a case of crafting 'in my head' and then setting about creating this imagined project. Other times I sit and play around with a few products, hoping for that happy accident!

Today was a bit of both! I knew which stamps I wanted to use for the challenge and the basic layout. What I didn't know was how I was going to bring all the bits together.


Anyway, here it is, my homage to Autumn. Some brass coloured gilding wax and some copper embossing powder define the seasonal tone of this card. A lovely laser cut wooden butterfly which I first painted with Spiced Pumpkin H2O before gilding it lightly. (By the way, that H2O Spiced Pumpkin paint is so much like the colour of blood that I was convinced I had cut my finger on my craft knife!!)

Pop over to the Lavinia challenge blog and just be amazed at the lovely samples the DT have created to inspire you and then have a go yourself!

Thanks for dropping in. As always I love getting your comments and if you have any questions about anything craft related I am always happy to help.

Kim xx