Monday 30 December 2013

Lavinia Challenge - Anything Goes!

Made this challenge by the skin of my teeth. Haven't really had much time to craft these past few weeks. Anybody else have the same problem?

During a lull in festive activities I went to check on the challenges I usually take part in and noticed that I hadn't done my usual Lavinia entry. As I didn't have a lot of time I decided to do something simple. Just some basic colouring in for my entry this time but I did jazz it up a bit with a brayered moon background.

I worked on Centura Pearl card with cherry red and teal Stazon ink. It seems to 'pop' on the Centura pearl card, it becomes more luminescent.

I then simply stamped the trees directly onto the background and the houses onto a separate piece of Centura with black Stazon and coloured everything in with ProMarker pens. A bit of decoupage and 3D gel and it was done.


To all my followers and visitors from LAVINIA land I thank you for dropping by. Hope to see you all again next year. Have a HAPPY NEW YEAR everybody.

Kim xx

Just in Time - MOO MANIA #51 Snowflakes / Schneeflocken

And there we have it! The final MOO of the year 2013. I almost didn't make it what with the festivities and work, but I am so glad that I did manage to fit in this last MOO!

The theme this time is SNOWFLAKES. Not seen any snow yet this winter but there is still time I suppose. It has been very windy here these last few days and very wet. 

Pop along to the MOO MANIA blog spot to see all the other entries and why not have a go yourself? Even if you don't make it for this theme then you won't have long to wait for the new theme which starts in a couple of days.

Although the Moo Mania blog spot has now opened the types of work up to include any format, ATC, Twinchie, etc I shall be sticking with the MOO. I really do love this size of art work. 

So here is my last MOO for 2013, a little scene of pine trees and snow flakes. 


I would like to wish all my followers a very HAPPY NEW YEAR and hope that you will continue to come and see me here in 2014. 

Kim xx

Sunday 22 December 2013

Christmas Confections

As we get closer to Christmas I would like to share with you something a bit different from my recent 'makes' and also introduce you to my partner in this venture!

My baby son, who is actually 17, decided it would be nice to make some chocolates as gifts for his friends. I remember making gifts of chocolates myself so was really excited to know that he wanted to do this.

After several days of selecting the types of chocolates we were going to make I set about buying the ingredients and getting all the equipment together. To be fair it wasn't that hard; most sweetmeats are made from the same basic ingredients.

We first made Peppermint Creams. A nice easy start to the proceedings. Sticky, but very satisfying to make.

Peppermint Creams - Oh look there is chocolate in them!
We mixed icing sugar with the egg whites, this was a hoot as the icing sugar formed vast clouds of sweet dust which found us 'sucking in' the air to get a hit of sugar!! A few drops of essence and a grating of lemon rind and the mix was complete. Lots of rolling and cutting and hey presto! Little discs of peppermint sugary sweetness.

Next we went on to make Coconut Balls, renamed Coconut Snowballs to fit in with the festive season. Now these were one thing that didn't have chocolate in them but we were quite tempted to add a drizzling of chocolate on them at the end but restrained ourselves as they wouldn't have looked so 'snowball' like with chocolate on them. 

Snowballs - No chocolate but there could have been!

Once the snowballs were safely settled in the oven we went on to the fudge! Now this did contain chocolate, and marshmallows, and evaporated milk, and butter, and sugar. None of it any good for you really but not something you would eat every day.

Fudge - Don't contemplate it for too long, just enjoy it carefully!!

The fudge was easy to make, and probably something that we might try with white chocolate, or coffee to flavour next time. A bit of heating and melting was all that was needed. Poured into a tin and popped in the fridge to set.

And so onto the final 'make', one which we had both been looking forward to the most, we got ready to make our moulded chocolates. A nice couple of silicone moulds and a paint brush were our tools. We melted just a little dark chocolate, well a LOT actually, and prepared to paint the moulds. 

Some Chocolate - enough to send a small school hyperactive really!!

This turned out to be a really messy and difficult process. The booklet accompanying the moulds showed lovely clean hands, perfectly painted moulds, and smiling faces! We on the other hand were covered in melted chocolate, found more chocolate on the brush than in the moulds and exasperated facial expressions all round!!! But we got there in the end. 

Each mould was filled with a cherry which we had soaked in a little Vodka and then topped up with more dark chocolate. Left in the fridge to set we were actually very pleased with the final result. 


Bags of Goodies

It had been my intention to take photographs of every stage of each of the different chocolates we made but a combination of sticky hands and enthusiasm meant we only got a few shots, but non-the-less I think the pictures we did get are enough to give you a flavour of what we got up to! By all accounts the chocolates were well received by his friends and there are enough left for me to take some to work on Christmas Eve.

I plan to put more photos and information over on my Baking Exploits pages so pop back again soon.

Have a great Christmas followers! I look forward to seeing you all again the New Year.

Kim xxxx


Tuesday 17 December 2013

Last MOO of the Year - Probably.

As the year comes to an end I look back fondly on my MOO experiences. It has been a joy to take part in these challenges and a pleasure to get so many lovely comments from other MOO MANIACS!! Thank you all!! xx Of course there is a chance that another challenge will just sneak in to 2013 but I probably won't have time to enter as it is getting very hectic here at home. Somebody mentioned ssomething about Christmas..........

Challenge #49 was all about Tools and this struck me straight away as being perfect for my tools; paintbrushes. So I was a little dumbstruck when challenge #50 hit the blog arena with the theme Painting Utensils/Malerkram. Had I blogged too soon? Was I psychic? Were 'they' trying to catch me out? 

Whatever the reason I knew I was going to struggle as I barely have any stamps featuring tools/paintbrushes/pencils of any sort! I know that MOOs don't have to be stamped but stamping is my preferred medium for this work.

Once again fate played into my hands and I happened to see a stamp online which fitted the theme perfectly. Would I get it in time I wondered? As you can tell from this late entry then 'Yes' I did get the stamp in time but it was a close call! I usually have my MOO made and blogged on the release date! The stamp is by STAMPENDOUS! and is called Artist Elements.

So here we have my #50 MOO -  Painting Utensils/Malerkram. Featuring the brush heads - I did try to do a shrink plastic piece but the images were already small and became just solid black and lost all the fine detail! 


I hope you like it? Feel free to leave a comment, take a look at the other MOOs HERE, and why not have a go yourself?

Kim xxxx

Friday 13 December 2013

My Christmas Card Production Line

I know, I know! I said I would tell you all about my Christmas cards a few days ago but that bloomin' REALITY got in the way again and I didn't get the chance.

In my best Noddy Holder voice (for those that haven't got a clue who I am talking about you had better Google him!) 

IT'S CHRISTMAS!!!

I doubt that you haven't heard him shouting this out a few times already as it is a classic Christmas song and my local supermarket have had this song, along with some other classics like Wizzard - 'I wish it could be Christmas Every Day' on a loop since mid October!!! The poor staff must be pretty sick of hearing it over and over and over and over and over and over and over and over............

Sorry, drifted off there! Where was I? Oh yes, my 2013 Christmas Card Collection.

This year I needed to make several sets of cards, mostly because I had a hundred and one ideas and I couldn't decide which one to plump for.  Also with my DT work (which I love, don't get me wrong) I was missing the production line style of card making. I actually really like getting a commission for wedding invitations etc because it satisfies me greatly seeing the piles of similar cards being adorned stage by stage.

And so my journey begins.  I needed to make some special cards for my work colleagues as this is quite likely to be our last Christmas together. Each year I say I am going to make my own cards for them and then time gets the better of me and I end up giving them (sit down or at least hold on to something firmly, you will be shocked by this!) S H O P   B O U G H T cards. I know, pretty poor really given that I could supply a small village with handmade cards for the entire year with the amount of 'stuff' I have!

So here is the Work Colleague set. 


These are little 4"x4" cards made using the Sheena Douglass stamps Heart Felt Wishes. I have always fancied making something in the American Home Spun style and these stamps were ideal for this. I used some little buttons and H2O paints on the little gingerbread shapes which were stamped with white embossing powder - it brings out the blanket stitch design a treat.

Then there is the Family set. 


I have made special BIG cards for my nearest and dearest, but these little 4x4 cards are for those relatives and close friends that I post to. A little tip for you, if you are worried about posting these little cards in their original 4x4 envelopes for fear of them getting lost in the machinery, then do what I do and keep them open and pop them into a standard DL envelope. Bonus is you get to keep the wee envelopes for another project!!! These are also made using the Heart Felt Wishes stamps by Sheena. This time they have been combined with some heavy white embossing on the body of the card and some Tim Holtz distressing around the edges. Can't put my finger on the maker of these 2 background stamps, but I only bought them recently so I will still have the details somewhere in my email inbox. 

And then there is the Neighbour set.  Now, I was being a little bit experimental with these as they are not a classic card as you will see. They are in fact Postcards. I had a load of brown card strips, right width but about 3 foot long! from a long time ago which I picked up in my local scrap store. May have mentioned this to you before, but basically it is a resource centre for factory/office 'waste'. Not as grim as it sounds as the products are all checked and verified safe for use. Anyway, I had a lot of it and needed to make use of it.


The front of the postcard has a 'nod' to Sheena on it. The foliage of the hanging holly decoration is from the newly launched Underwater Angels stamp plate. I stamped it in Tim Holtz Weathered Wood ink and then using a small holly and berries stamp (sorry, no idea where from!) I stamped in red ink to give this hanging bunch image. Some faux stitching around the edges with a fab stamp from Inky Doodles, a sentiment and then on the back I used some Clarity Stamps from the Mail Art theme to give that authentic postcard look. Oh yes and a little bit of clear glaze on the berries to make them 'pop'.

Finally, there is the Inkoid set. This special group of people will be receiving their cards in the next few days (postman willing!). They are a group of people, some of whom I only know 'electronically', in 2D so to speak, through our craft work, but all of whom I admire very much. I haven't uploaded a picture of these cards yet as I don't want to spoil the surprise!!

I hope that you like my Christmas 2013 cards? I hope that you have all yours ready to go? 

I plan to do a 'How 2' on the Inkoid card design in the next few days so come back soon to see if I have done it!!

Phew! I need a cuppa and a sit down in a comfy chair after that blog! 

Hope you have a great weekend. I am off to work for the next 4 days so I never get excited about it being Friday! But please, you enjoy it!!  XX

....and we have Lift Off! (Well nearly!)

So it is only minutes to go before the lovely Sheena takes to our screens once more with a NEW set of stamps in the Coastal range.

Here are some more of my show samples, it was a blast making them. Wor Sheena does give us some brilliant products to work with so I suppose it isn't that difficult to create great projects like these.

Here they are then, I will be sitting with my feet on the coffee table, hot drink in hand - hasn't it turned cold?

Create and Craft TV Sky channel 671 is your destination, 10am and 4pm (stock willing!)


Kim xxx


Thursday 12 December 2013

Sneaky Peek #4 - Sheena Douglass - New Stamps

First thing I had to do was decide which of my samples I was going to show you today, that took longer than I expected because I want to show you so many but as it is only 24 hours away from 'Show Time' you wont have to wait long to see all the wonderful samples me and my fellow Inkoids have made for this launch. Details of the show times are 10am and 4pm on Create and Craft TV, which is channel 671 on SKY. Check HERE for other providers.


The sample for today is quite a contrast to the previous two I have shown you. I think this colour scheme is perfect for that sun bleached, salt washed, weathered look. Might have said that before in my first Sneaky Peek, but it is true!!

I was initially worried that the images were going to be too different in size for this to work in the layout I had planned but I was pleasantly surprised to find that the angelfish, starfish and the seahorse were pretty identical in height and that the starfish and seahorse were good width wise also. It made the layout so easy and I think the final card has a pleasing look to it with just the right amount of 'white space' on the 3 images.

I mentioned in a previous blog that while waiting for the stamps to arrive I had created some backgrounds in the hope of getting ahead. This is another one of those backgrounds. I wanted to go for the ditsy-print background, and so I used the little shell stamps from the previous launch. I stamped then swept over the whole thing with water to try and get a soft, water colour, run ever so slightly look to the background. It worked just enough to fuzz the edges of the images up a little and I used this same technique on the main images. Once the outlines had dried on the main images I added more colour by taking ink direct from the ink pad with a brush. 

My Ingredients are
  • Tim Holtz Distress ink - Weathered Wood
  • Cream water colour card
  • Navy card
  • Strip of corrugated paper
  • Sentiment from Ancient Arches - available HERE
  • And my mystery ingredient, that stringy, woven material. If you can guess EXACTLY what it is then I will award you a gold star!!
Have a great day, and don't forget to settle down with your cuppa and, yes, go on, put your feet on that coffee table, relax and watch Sheena weave her magic.

Kim xx


Tuesday 10 December 2013

SNEAKY PEEK #3 - NEW SHEENA DOUGLASS STAMPS

Day 3, you know the score, Sheena Douglass NEW STAMPS being launched this Friday on Create and Craft TV at 10am and 4pm. 

While I was waiting for the products to arrive that I was to be working with I wasted no time in getting some background work done, literally!

I knew that Sheena was asking for samples made using the recently launched Luminarte Silks and so I set about making some backgrounds ready to use with the new stamps. As we had already been told the theme was to be 'Under the Sea' I got out the shells from the 'Little bit Scenic - Sea Shells' plate available HERE. One of my other hobbies is patchwork quilting and I have always admired the scallop design and this inspired me to create this background. It involved a lot of masking and careful placement but the pleasure came from the painting! When the new stamps arrived my first 'getting to know you' stampings used the very clever shadow stamps. These are a solid stamp in the same shape as one of the detailed stamps. These angels are not the only ones that come as pair so look out for the others! These shadow stamps are brilliant for lots of different techniques but I simply used them to stamp a row of green angels which I then over stamped with the detailed angel stamp. I added the bubbles, which are also in the new sets, and then mounted the row onto the background. Of course I didn't waste the bit that went under the strip of fish! I cut it so that there was just enough to go under the fish! Who knows it is not all the way under right?


My ingredients list is
  • Silks set #1 - Bolivian Blue, Key Lime + Olive Vine
  • Black Archival ink

Well, there it is, sample #3. Hope you like it?     Kim xx

Sneaky Peek #2 - Sheena Douglass - NEW STAMPS

As promised here is the second of my Sneaky Peaks showcasing the next Sheena Douglass stamp launch this coming Friday. The shows on Create & Craft TV are at 10:00am and 4:00pm so don't forget to tune in, you know how popular the 'Sheena Shows' are! 


This card features another one of the lovely new stamps, an angel fish. I have used a classic combination of black and orange. This has kept the fish pretty realistic in colour. I have also used one of the coral stamps in a repetitive way to provide a decorative strip across the card. The background for the fish is actually one of those happy accidents. I was painting another sample with the Luminarte Silks; Set 4 with the hot colours Spiced Tomato, Pomegranate and Ginger Peach, using an acrylic block as a pallet. Now that I use the brilliant Rock-a-Blocks to mount my rubber stamps on means I have a fair few acrylic blocks spare!! Anyway, there was a bit of paint left on the block so I sprayed it to prevent the paint from drying out as I knew I wouldn't be going near the sink for a while. I turned it over onto a piece of card to blot some of the paint off and left it there momentarily while I washed the brush. When I lifted the acrylic block off there was this lovely pattern. Waste not want not! Probably wont get another like it if I did it deliberately. I had another accident when trying to draw a straight line around the card, but recovered from it by using the 'meant it to be wobbly' technique! 

My ingredients for this card were 
  • Black Archival for the coral
  • Black embossing powder for the fish
  • Orange, black and white card
  • Orange corrugated strip
  • Black gems
  • My accidental background!!
  • Black pen


Well, there we are, come back again for another peek tomorrow, and don't forget to check out the other Inkoid samples via the links HERE.

By the way I managed to make a fair few Christmas cards today. Will show you them tomorrow.

Take care! 

Kim x

Monday 9 December 2013

Been Quiet but with Good Reason - Sheena Douglass - NEW STAMPS

It is that time of year when all us crafters wish we had stuck to our promise of making our Christmas cards and gifts early!  I am only just getting started with my Christmas shopping so I don't hold out much hope for every single person on my card list getting a hand made card this year. Much the same as last year then!

Anyway, the reason I have come here today is to tell you all about the latest stamp launch from the wonderful Sheena Douglass. There are 2 new plates which work alongside the recent coastal theme. This time Sheena has gone 'Underwater'.

I was given them to play with sorry WORK with a few days ago. Yeah, I know it is a terrible job but somebody has to do it! Sheena has once again come up trumps with these designs. You are going to LOVE them! They also have a very clever element to them but I will keep that to myself for the moment, don't want to give everything away on day one!

Right, here is my first sample, a fancy little number featuring the lovely seahorse stamp and the long awaited Kraft card. I love the combination of the navy + white with the brown of the Kraft card. What do you think?  


Sheena will be demonstrating these new stamps on Create & Craft TV this coming Friday, the 13th. Show times are still to be released but come back here to check as I will update you all as soon as I hear. I will also be letting you know more about the products on the show over the next few days.

The ingredients for my card are
  • The NEW Sheena stamps
  • Sentiment from Ancient Arches (available HERE
  • Tim Holtz distress ink pads in Weathered Wood and Chipped Sapphire 
  • White embossing powder
  • Luminarte Silks ICE glaze
  • Kraft card
  • Navy card
  • 3D gel glue


So there we have it, Sneaky Peek number one. Don't forget to see what the other Inkoids have been creating by going to their blogs, the links are all HERE.

I need to crack on with my Christmas cards now, so I will see you tomorrow with another Peek. Have a great day!

Kim xx

Tuesday 26 November 2013

Sheena Douglass - Back in the Room

Hello Readers! Once again the amazing Sheena Douglass is on our TV screens demonstrating her little socks off. Tune in at 11:00 and 18:00 to see her on Create and Craft TV, Sky 671. There are some NEW products on these shows. Sadly not new stamps this time but some essential (hint hint) new H2O paints and a popular type of crafting card (may have got my spelling a little wrong with that one!) 'The clues are there!' Of course you will be able to buy the featured stamps to add to your collection if you don't already have them!

With the launch in mind I was tasked with making a few samples for the show, which was harder than you might think for me this time. I had originally said that I was too busy to help what with it being Birthday week for several family members, but then I got itchy fingers and made some anyway!! It was a quick turn around, but that is what made it exciting. It was lucky for me that Sheena was doing a workshop locally so I was able to hand them over in person saving the postman the trouble of lugging the haul up to Douglass Towers!

Better show you a few of the cards I made then I suppose, it is very easy for me to get carried away with the back story and completely forget why I am here!!


This first one features stamps from the 'Happiness' plate, the extremely versatile crackle from the Ageing Beautifully plate, Wine + Roses H2O, a little Tim Holtz distressing ink Antique Linen if I remember correctly, and a touch of Gilding Wax. I painted the dove (Hobbycraft, fabric covered wood) with the H2O and gilded the edges. I 'pulled' some of the colour off the card in the area of the window to make it lighter simply by wetting and blotting the paint. This has the effect of bleaching without the smelliness! For the glass in the window I simply sanded a bit of thick acetate (probably cut from packaging - never waste a thing!) to give the look of aged glass.


This next one uses some of the new Silks paint, in my favourite colour Bolivian Blue teamed with the luscious Olive Vine. I painted a border using the Olive Vine on the black base card making sure it was just slightly bigger than the next layer which was the same type of black card stamped with the Bolivian Blue using the linen stamp from the Ageing Beautifully plate. I love the way the Silks work as a stamping medium. I then took the Destinations stamp and stamped onto some Neenah card using black StazOn and water coloured the elements with H2Os in the same colours as the Silks. A bit of fussy cutting held on with silicone glue and there we have it. The shimmer of the Silks and thes is lovely. 

Then just because I had the idea in my head I simply had to do a mono-chromatic card. I wanted to do a black and white water colour thing, sticking to just the black, but something made me add the Sunflower H2O coloured bits to the street lamp and windows! I used the linen stamp again to make the background and added some lovely yellow ribbon. The sentiment from the same plate was added using Silicone Gel glue.


All in all a varied selection of cards. I hope you enjoy watching the shows tomorrow. I know I will be sitting comfortably with my cuppa, feet up and 'phone off the hook!

If you have any questions for me or Sheena feel free to get in touch. 

Cheery bye for now! Kim xx


Monday 25 November 2013

LAVINIA CHALLENGE - #9 - BRIGHT HOT COLOURS

Ok, just scraping in by the skin of my teeth! What does that mean anyway? I feel the need to do some 'Google-ing' now!!

This month (and for the next few days only!) on the Lavinia Challenge blog the theme is Bright Hot Colours. Bit of luck really as I have a fan-tab-u-lous new set of paints from LuminArte called SILKS. They have been available in the States for some time now but thanks to me being an Inkoid I was lucky enough to get my inky mits on some purely for research purposes prior to their official launch recently. Hah! Who am I kidding? I played like a child with these paints, they are wonderful!! Sploshing the wonderfully named Spicy Tomato all over the place and getting Ginger Peach under my fingernails!!

I also recently won a Lavinia challenge and the prize for this was a free shopping voucher to spend within the Lavinia Shop. As I didn't own any Faerie stamps I used this opportunity to get some and I felt it appropriate to use one of my new stamps in the challenge for this month. 

So here we have it, all bright and hot. Why not pop over to the Challenge blog and check out all the lovely DT examples and the entries?  If you have any Lavinia stamps then have a go yourself.


Need to dash, 'you-know-what' is nearly upon us and I need to make some appropriate cards for the occasion.

Take care! Kim x

TWINCHIE CHALLENGE #9 - SILHOUETTES

Morning! Well, actually it is no longer Morning, but I did start this challenge in the morning so that is why I said 'Morining!'

We have a new theme for the Twinchies Challenge blog this time of SILHOUETTES. Now I am not one to miss a challenge on the Twinchies blog but I have been, and continue to be, VERY busy at the moment. Not just in the crafty world but also at home. 

This is therefore a flying visit and a very 'bland' Twinchie from me this time. No fancy 3D stuff, I simply have not had the time.

The background is painted with those lovely NEW Luminarte Silk paints that Sheena Douglass launched the other week on Create and Craft TV. Me being a frugal crafter (do you know a crafter that isn't that way inclined?) I 'painted' my brush clean on a scrap of card before rinsing it in water. Now that is tight I know but why make your water a nasty muddy colour and pour it down the drain when you can make a plain piece of white card all beautiful? 

Here we are then, the Silhouette Twinchie. 


I say it every time, but why not have a go yourself? Pop over to the blog and check out all the lovely entries and the DT examples. Be inspired!

Busy, busy, busy, must dash! Take care my Lovelies! Kim xxx

Thursday 21 November 2013

MOO MANIA #49 - TOOLS - WERKZEUG

Hurrah! It is Moo-Day. Yes, I know it is Wednesday, but in my world it is Moo-Day. Only comes round once a fortnight and each time it comes round I get all excited!

This time on the challenge, which you can find HERE, the theme is tools. I don't own any stamps with hammers, screwdrivers, pliers etc. on so I found a stamp that shows MY tools, well some of them at least!! For those that are keen stampers you might recognise the image. 


I didn't finish it in day light so I had to use the flash on my camera so not the best picture. Once again I have added some dimension by making the brushes and pot 3D. It doesn't show too well on this shot. 

Anyway, time to get on with some important sample making, (that is a hint by the way!) so I will love you and leave you.

Thanks for dropping by, if you have time please leave a comment, it is nice to hear from you.

Kim xxx

Friday 15 November 2013

Today is the Day - New Stamp Launch - Sheena Douglass

Hello followers and visitors! You should already know about the launch today of some new, really beautiful stamps from Sheena Douglass on Create and Craft TV at 2pm. 

They are all about the coast. They come in the group 'A Little bit Scenic' and feature a whole plate of stamps of shells. When I received my stamps from Sheena a week ago to create the show samples I was a bit nervous about the timing, I like to 'get to know' my products well before making anything; you know, playing around with their shapes, using different colours, different mediums, different papers, etc. but this time it was quite literally TIME that I didn't have! So I dove (or is it dived?) straight in. 

The time spent cutting the stamps out from the plate was used as thinking time, designing in my head, but the more I cut the more excited I became about getting on with the sample making! These stamps are awesome!!

 'Sheena you've done it again!'


So here is a card that I made using only the stamps from the Shells plate. If I had had the time I would have made a box, a shadow box, rather like a museum tray in black with a different shell in each section, but there was no time, so I made a card representation of this idea. Using black card as the base I stamped each shell, or a group of the smaller ones, onto some grey card in jet black ink. Just look at how crisp these stamps are! I then added a shadow line and some shading to each shell with ProMarker, I think I used Pastel Beige. I am really pleased with the simplicity and 'cleanness' (does that really have 2 'n's!?!) of the finished card.


You know the phrase 'A bad workman always blames his tools'? Well, the exact opposite is true as far as using Sheena Douglass products are concerned. It is because we have such brilliant tools that us Inkoids are able to produce samples of the standard and quality we do. I would like to bring in the phrase 'A good crafter always thanks the tool maker' for without the right tools the job is never going to be right!  'Thank you Sheena!'

So, tune in today at 2pm with your favourite beverage and nibble ready, to watch Sheena weave her magic, pick up a few tips along the way and be inspired!

Happy crafting!  Always pleased to get your feedback.

Kim xx


Tuesday 12 November 2013

Time for another Sneaky Peek - New Sheena Stamps!

BREAKING NEWS FRIDAY 2PM 
(That is what happens when you pre-blog!!)

 Firstly, I don't have any news to share yet about ShowTimes but hopefully I will know soon. Keep an eye out for the updated schedule at C&C. I can tell you that it will be a brilliant show. No, I am not able to see into the future, I just know that with these stamps and the LuminArte Silks are going to fly out of the warehouse!! 
Here is my sample for today, it is in complete contrast to the bright shimmering orange card I showed you in my last post, but this just goes to show how versatile the Sheena Douglass products are.


For this card I used Tim Holtz distress inks, Peeled Paint, Dusty Concord and Broken China on some earthy, rustic paper and card. I love using bits of card and paper that I have rescued from packaging and the pale brown card on which I stamped the sentiment and the main shell come from a Volvo car brochure! The back piece is ribbed craft card, probably from Hobbycraft, and the main body of the card is some heavy weight burgundy paper I found in a clearance bin at Paperchase many years ago. I can't resist a bargain especially when it comes to paper!

Taking this range of new Sheena stamps as a whole I am getting a holiday feeling and with that in mind I remembered I had this natty little punch. It is reminiscent of old photo albums. It takes a wee while to get the measurements right but it provides a fantastic way of putting the layers together.

So there it is, sneaky peek number 2. I'm going to hit 'publish' now so you technically got two peeks today. Tomorrow I have a craft room to tidy and I want to get it sorted ready for some Christmas crafting.

Check out the other Inkoid samples on their blogs, link via HERE.

Great that you dropped by, if you have any questions please feel free to ask me. 

Happy crafting! Kim xxx

Oh I do Like to be Beside the Seaside! New Sheena Douglass Stamps.

Yep, Sheena is launching another set of stamps this weekend on Create & Craft TV.  Me and the other Inkoids have been having a fantastic time trialing the stamps and also a wonderful new range of paints from LuminArte. It is a hard life but somebody has to do it!

I will dive straight in and show you one of my samples, it features the new paint and a couple of the images from one of the stamp plates.


I really like the combination of orange and black, always have done. The colour that I have used is Ginger Peach, it is a goldfish orange and it shines so much because of the mica and other minerals in it. The paint can be used on a variety of surfaces and cleans up with soap and water.  I have used one of the embossing folders from the Oriental range to create a watery background to show off these lovely shells.

So what about that shine? Normally when taking a photo I try to avoid the glare from my light but this paint simply won't let that happen! It just shines and shines and shines!! 

As usual Sheena has done a fantastic job drawing these beautiful images and giving us such fabulous stamps to work with. Wait till you see the other coastal related images, they are wonderful, and so versatile!

Pop over to the other Inkoid blogs to see some of their samples, find their links HERE.

Come back soon to see another one of my samples and get more information about show times.

Happy crafting! Kim x

Wednesday 6 November 2013

MOO MANIA #48 - HANDS

Quick Moo while I was waiting for a parcel to arrive (which still hasn't by the way!)

HANDS is the theme this time at MOO MANIA and I have used a part of a much larger stamp depicting God reaching out to Adam by Michelangelo.


Coloured with sprayed inks in vibrant magenta, cyan and yellow (why has poor old yellow been left with such a simple name?), cut out and 3D mounted onto a base of the same colours but switched round to give contrast.

Iconic image and perfect for this challenge.

Why not pop over to the blog and check out the other entries and the DT samples. Have a go yourself. It will only take a few minutes as it is such a tiny little thing but so very satisfying.

Comments are very welcome. Happy Moo-ing Kim xxxxx


SAD and HAPPY at the same time - FUN WITH ATCs CHALLENGE #100

I was quite sad to read that this challenge from Fun with ATCs is to be the last. I have only been taking part for the last 10 or so and really looked forward to them. 

Anyway, my mind started to think about their brief for this 100th challenge which oddly enough was the number 100. Instantly I thought of 100 ATCs and then realised that was a big ask. With another special project on the go with a deadline of next week I felt that was pushing my limits a bit. I then thought I would look back at the ATCs I had done and that was when it struck me.

Teeny tiny weeny ATCs! Even better, replicas of the ones I had made for the challenge!

Oh My Goodness was this a fun challenge! And I think it worked! 


I couldn't fit them all on so I started with #95. Check back on my blog to see the full size ATCs for these challenges, but here is a shot of them together with this 100th ATC which shows just how small the replicas are!


It was fun doing this ATC and doing the challenges! I will miss you 'Fun with ATCs'. 

Check out the other entries and the great inspirational ATCs from the DT.

As always it is great to read your comments.

Happy crafting! Kim xx

Monday 4 November 2013

Fabulous NEW Stamps - Cheering me up a bit!

Been a bit off colour these last few days. Sitting looking at my craft desk and not much happening in the way of inspiration. Kept fiddling with things, trying to tidy up, having a tinker with Twinchies, but nothing 'HUGE' was happening in my head.

Then I remembered I had some new stamps arrive the other week from London. London ONTARIO that is. I had opened the packet, given them a quick trial stamp and them promptly lost my mojo!!!

With a big NEED to do something crafty running around in my head I cleared the decks, placed the stamps, black ink and white paper firmly in front of me and told myself I WAS going to make something!!

First I just stamped the images using black ink on white card. When I saw all these black on white images I felt the urge to do some 'colouring in'. Always good for the soul, who doesn't feel calmer, happier, and comforted when they do some colouring in? I used H2Os - Wine & Roses and Ginger Peach for the leaves which led on to the creation of the background which was those 2 colours plus Sunflower and Hot Cinnamon. I used the droplets stamp to a little more interest to the background stamping in a red ink.


Having coloured all the leaves in I decided to cut them out and it was during this process that I decided to make a flower out of them. It has a sort of poinsettia look about it don't you think? I am still not sure if I should add something; a sentiment somewhere or a single leaf. I will just wait and see what happens. With my mojo being on some sort of sabbatical I think I might wait till it returns before making any hasty decisions.

If you like the stamp why not pop over to the web site Designs by Ryn and take a look at the other fantastic stamps there are. FYI HERE is the one I used for this card.

Hope to be back soon with more makes - mojo willing! 

Kim xx

Sunday 3 November 2013

TWINCHIES GALORE! Bling, Animals, Animals with bling - all rolled into one blog post!

So, call me lazy if you like but I wanted to get these beauties in a blog as soon as possible because very soon I shall be working my little fingers to the bone on a new project which will need my full attention and time.

By the way, did you know it is only 51 days give or take a few hours, until Christmas? Check here for current status. You can see now why I shall be busy!!

The challenges in the Twinchie world this time are ANIMALS for the Twinchie Challenge and ANYTHING GOES plus BLING for the Show us your Twinchies.

I started the Bling challenge with a particular stamp in mind, the lovely bee from the Sheena Douglass stamp set Floral Fantasy Violets. It looks like a jewellers plan for a gem encrusted brooch. I wanted to use a combination of colours that I like but haven't used for a while, purple and lime green. 


In the end with this Twinchie I didn't think I had really embraced the bling enough, so I have simply made this for my own library of Twinchies. Mind you, the shine on the black embossing and the reflectivity of the mica in the H2O paint is quite good.

This led me on to the next version of the bee, this time I went all out with the faux gems! It isn't really my thing to use this many gems on a piece but hey that is what the brief wants so here it is!

Show us your Twinchie - Anything Goes + Bling

I don't have many green or purple gems so I had to use a different colour combo. This time I used gold embossing powder to give the look I described earlier of a real piece of jewellery. (I still prefer the purple/green one!)

And then there is the final Twinchie I made which is for the Animal challenge. I used one of the free Craft Stamper magazine stamps of the boxing hares. Somebody needs to tell me if the Twinchies came first or did the size of their free stamps launch the whole Twinchie thing? I did my usual moon and dimensional thing on this one. It is nice to be able to use up those little scraps of card that have interesting designs and colours on them. I used a little circle punch for the moon. I was amazed to find one that was exactly the right size! I stamped the moon part of the image again onto another part of the paper so that is was a different colour from the background. 

Twinchie Challenge - #8 Go Animal

That is all for today my lovelies! I need to get my work space cleared down for some serious work next week. Don't expect to see me for a while as I will be VERY busy!

Pop along to the Twinchie blogs and see the other wonderful entries and be inspired by the DT samples. Have a go yourself, you will be amazed at how much pleasure you get from making little pieces of art.

Thanks for dropping in, please leave a comment, I love reading them.

Have a great November! Kim xx

Thursday 31 October 2013

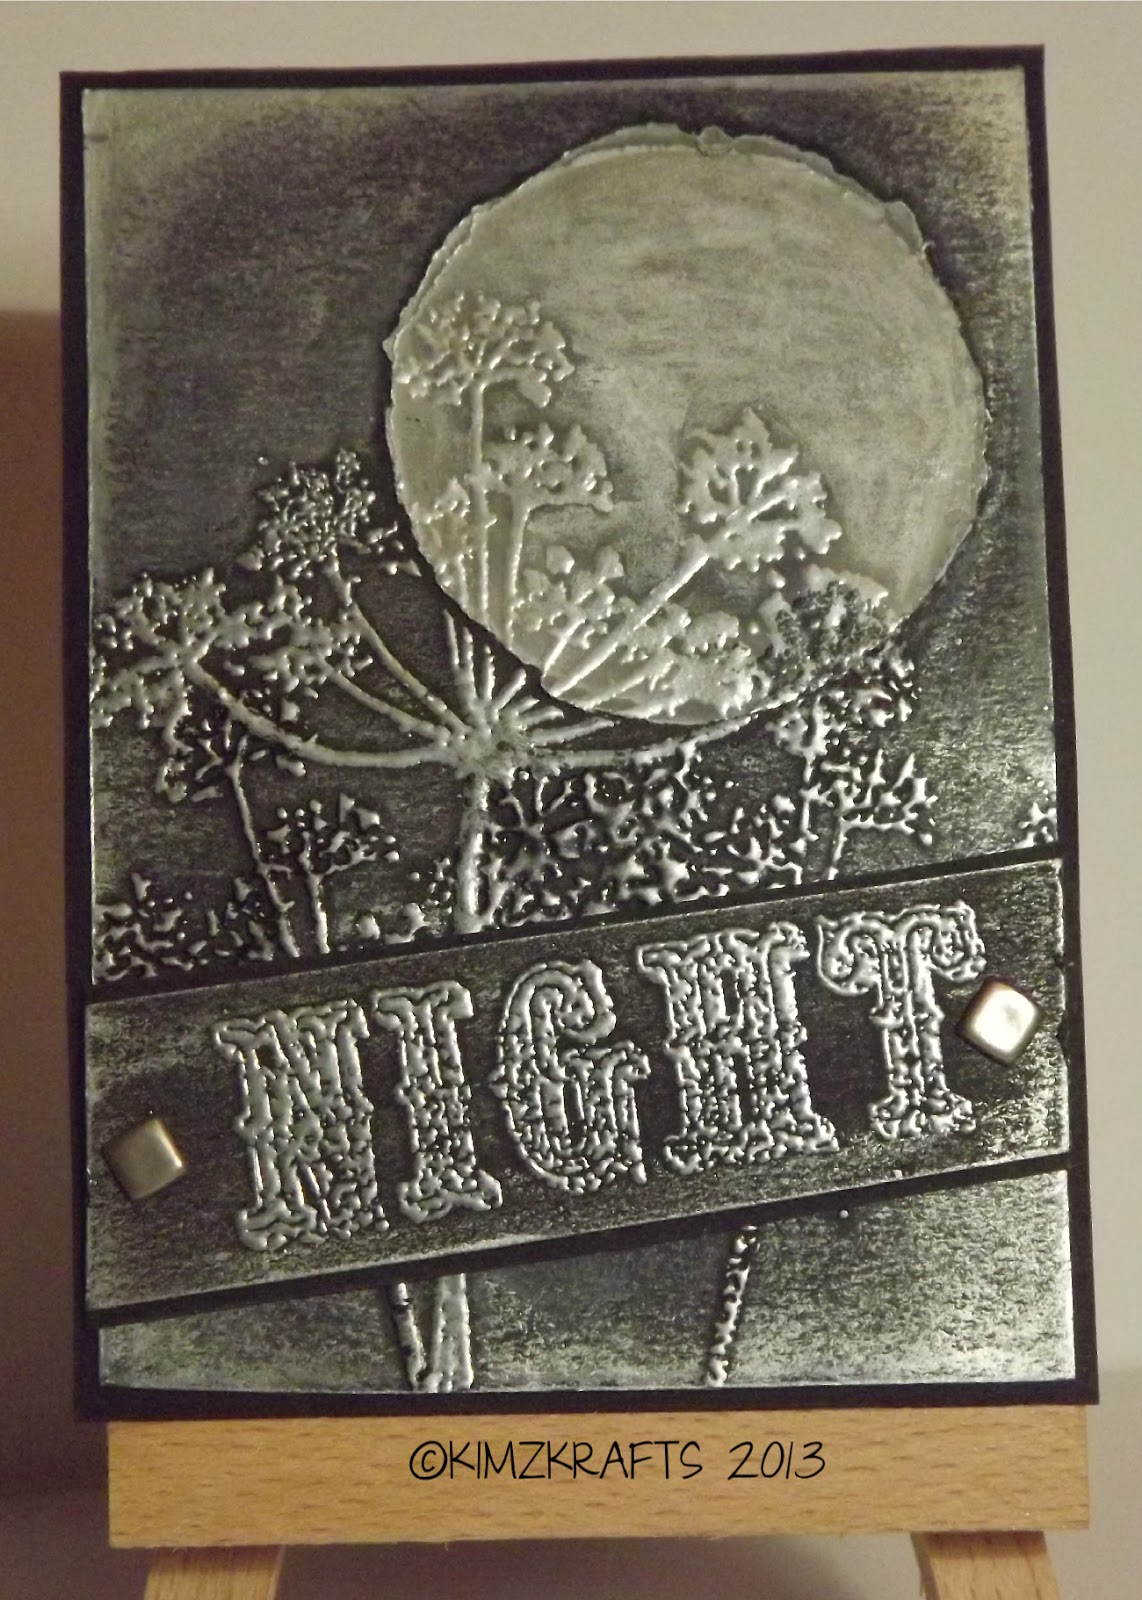
FUN WITH ATC's - Challenge #99 - NIGHT

I thought I would leave this blog until tonight HALLOWEEN but I made this ATC a few days ago. It is for the Fun with ATC's challenge which this time has the theme NIGHT.


I used one of my favourite stamps in one of my favourite ways, a silhouette against a moon!! Anyway, I used 2 roughly cut circles of tracing paper for the moon. I like the rough edges and the layers.  I stamped onto the black card with clear embossing medium and used a silver pearl, a hematite, and a black embossing powder on each of the images.  This worked well but when I started to use some gilding wax around the edges I thought I would add a little to the embossed seed heads as well. 

I used the NIGHT part of a Christmas stamp, SILENT NIGHT, as a banner across the bottom held on with 2 lovely square metal brads.

Pop over to the challenge blog and see the other entries and the lovely DT examples. Have a go yourself!

Need to keep it short as I have some haunting to do!

See you all on the other side of midnight!

Kim xxx

Friday 25 October 2013

SHEENA ON TV MONDAY 28TH OCTOBER

As the title of this blog suggests the lovely Sheena Douglass is back on our screens again this coming Monday! With her batteries recharged after a well deserved holiday Sheena is going to be demonstrating and chatting all the way through the 9am and 2pm shows! I wonder who the presenters are going to be?

What products are going to be on the shows I hear you ask? Well, it features the beautiful Oriental range launched a few weeks ago. You know the one with the fantastic paper pack and the lovely embossing folders? 

If you remember back that far I made a little 'silver' box as a sample for the shows which one of the presenters, Nigel May, enthused over so much I felt I had to make him his very own box. There was a risk of him 'borrowing' the sample! He tells me he keeps his studio ear piece in it! 

My TV sample

The Nigel May Box
Anyway, while Sheena was away (probably enjoying herself far too much!!)  I felt the need to create a card to surprise her with on her return. And here it is....................


It uses my Zig-Zaggy Fold card base and some of the Oriental stamps from the Silhouettes and Sakura plates. The card I used has a sort of elephant skin texture to it, I have had it for ages and as I am trying not to buy any more stuff (like that is going to happen!)  I thought I would use it. You could get a similar effect by using the crackle stamp from the Ageing Beautifully stamp plate. If you stamp and clear emboss it onto the base card the distressing ink you apply around the edges will be resisted and leave fine lines in the colour of your card. I also masked a moon behind the birds on one of the panels. I find that more than one moon on any project, even if it is a patchwork piece like this, tends to 'mess with your mind' a little! 

What I like about the Zig-Zaggy Fold card is not only is it a great way of using up your precious scraps of card/paper, (you know the little bits that we crafters keep 'just in case') it is also a great way of using some of the smaller stamps to create a large card without the end result looking over fussy. Those little borders between the images make it look like a well displayed art gallery.

Well, there we are. What was meant to be a quick blog to tell you about the forthcoming Sheena Show on Create and Craft has turned into a rather long piece! Hope you are still with me on this one?

Tune in to Create and Craft TV  for some great demos, a lot of Sheena chat, and maybe even a few Halloween bargains! 

Have a lovely weekend! Kim xx

PS Comments always welcome! x


Wednesday 23 October 2013

TWINCHIE ALERT - #7 DOODLING

My other quick make today is a Twinchie for the Twinchies Challenge. The theme this week is 'Do Some Doodling'. The invitation went out and I accepted! This is what I came up with.


A couple of simple die cut flowers which I doodled on. Now I am an old hand at this doodling game, I was doodling full sheets of A4 long before the internet was even heard of! Have a look HERE and see what I mean. 

Why not pop along to the Twinchies blog page and look at the other examples, Better still have a go at one yourself. We all love a Twinchie!

Thanks for coming over. Please leave a comment, I love reading them.

Happy crafting! Kim xxx

CATS - KATZEN - MOO MANIA #47


Yippeeeeee! It is Moo Mania day again already. 

 I just L O V E this challenge. 

As the title suggests it is all about cats this time. I don't have many cat stamps but I recently bought a magazine with a free set of cat/dog stamps on and what do you know? They are just the right size to fit on a Moo. Well, almost!

Those of you that also bought the magazine will probably notice that I have cut the party hats off the heads of the cats! Rest assured it didn't hurt them one little bit! To be honest the hats made the cats toooo big to fit on the Moo so they had to go. To make up to the cats for the loss of their party hats I gave them some lovely 'nearly real' black whiskers. (The paper ones also got chopped off in the process of cutting out the heads!!!)


The usual fussy cutting and 3D glue gel are in evidence but rather unusually for me the Moo is in landscape orientation. The cats are coloured with H2Os and the background is stamped with grasses and leaves.

Hope you like my cute cats? They all look like they are sat waiting for their dinner! 

Go see the other entries into the challenge and check out the DT samples over at Moo Mania. Why not have a go yourself?

Thanks for dropping by. Please be kind enough to leave a comment for me, I love reading your views.

Happy Moo-ing!  Kim xx