Wednesday 31 December 2014

Moo Mania #78 Polka Dots


Hello Moo Mania & More followers. I hope you all had a good time over the festive period? I did but it was a close call. I was unwell for a few weeks at the start of December and really didn't feel that Christmas was going to happen. I won't dwell on it, it is history now. Back to crafting - yippeeeee!

So, I missed a couple of themes but you know me, I will catch up with them as soon as I can.

This time the theme is POLKA DOTS. I cut some rainbow coloured card with a funky MemoryBox die but because the paper was slightly too thin I had to shim it and run it through again. It was this process that made me think of using the punched out dots. No! I didn't stick all those tiny dots on. During the cutting the spots became embedded into the piece of paper I had used as a shim and I simply coated the whole thing with clear embossing powder. So I have negative and positive with the blue ones and just a positive with the pink as I had used a really grotty piece of card for the shim and it didn't look very nice! A few contrasting dots and some rainbow thread was added to give more interest. 

OK, I am leaving it there as I need to catch up with a few other crafty things. Hope you have a great New Year and that 2015 is good to you!


Happy days! Kim x

Monday 15 December 2014

Marvellous Monday with Visible Image

Yes, I know it has been a few weeks since I was last here. Without going into too much detail I needed to rest, Doctors orders, so I did as I was told! Fingers crossed that each new day is a good one for me.

Right, so, where were we? I suppose for my blog followers I should bring you up to date with Visible Image makes that I should have blogged about during my absence!

Just in case you didn't know it, Visible Image released a new set of stamps recently, under the title EXPRESS YOURSELF. These are some of the most amazing 'wordy' stamps out there at the moment! I had such a blast working with them. You know how much I love making backgrounds and these stamps gave me the chance to use some of my favourite pieces of coloured paper to show the stamp off.


Blowing Dylusions Inks

Life is a Journey. I simply placed a drop of Dylusion ink onto the edge of a piece of smooth white card and blew the ink forward with my trusty Tim Holtz puffer. Of course a straw and your own puff would work just as well. I added some further interest by stamping with the polka dots and the ink splats stamps. That bit in the top left corner makes me think of kiwi fruit and the pink band reminds me of dragon fruit!


More Dylusions Inks
Listen to your Heart. This time I used a piece of water colour card which I misted with water before spraying on some vivid Dylusions inks. The heart from the Tin Man set was stamped, cut out and mounted on 3D gel. A simple hand drawn line and dots around the card tie it all together.


Brusho Powder Paints
Life is What you Make It.  Water colour card again, spritzed with water and then painted with some of the deeper Brusho colours. I loved this piece of card so much that I wanted to use every piece of it hence the triple layering and paper ribbon to use up the last scrap! It makes a change to use white embossing powder and I think this is what made the whole thing work so well, the colours really 'pop'.


Dylusions Inks 

Karma.  Such a simple card but pretty effective don't you think? This was an off-cut from something bigger and the hoarder in me kept the piece of card and I am glad I did! Stamping the image over the lightest area really worked. 


Tim Holtz Distress sprays

This is Me. I have a very limited collection of Tim Holtz sprays, mainly in red and pink, and this off-cut was the perfect size for the INKognito gerbera. It was inspired by the card I made for the launch of the INKognito stamps with the off-the-page stamping. I used black embossing powder for all the stamping to give a really intense black image which contrasts well with the reds. Using a white marker I then added some hi-lights. 


Spotty-dotty!

Just be Happy. A simple background made using a toothbrush and Brusho paints. I like to work with my Brushos 'wet'. i.e. ready mixed. I use about a 1/4 of a teaspoon of the powder to make a small amount of paint at a time. To be honest I don't really get on with this sprinkling lark! Anyway, I did the classic splattering using the toothbrush dipped in the paint. Once it was dry I sprayed the Grunge Polka Dot stamp with water and just stamped onto the dry splatters. This caused the paint to become wet again and give these subtle spots. I then used black embossing powder to stamp the dotty part from the INKognito Man stamp for the area under the banner.


"Love the Background!"
Create your Imagination. When this was published by Helen in the Visible Image group I had a few people ask me how I did the background. Hmmm, I had to try and remember!! Well, I have remembered now but I am going to hold off telling you about it as I plan to do a How2 for it in the new year. 


So there we have it! I think I am all caught up now. Hope you all have a lovely time next week, hope you get to be with your loved ones and celebrate. 

Good Heath and Happiness to you all! xx


Click HERE to go to the Facebook group.
Ask to join if you haven't already. 

Click HERE to subscribe to the Newsletter

Click HERE to go to the Visible Image blog to see
DT inspiration projects and check out the Gallery

Click HERE to go to my KimzKrafts Facebook page


Monday 24 November 2014

Marvellous Monday with Visible Image

Is it starting to feel a little cold where you are? Winter is on its' way. I have so far managed to refrain from getting too Christmassy (is that how you spell it? Spell-check doesn't like any of my attempts to spell it!) but this week I am showing you something I have made which could be a Christmas gift.


NEWS -NEWS - NEWS - NEWS -NEWS - NEWS - NEWS

New stamp release from Visible Image - pre-orders now being taken!


You are going to love this new selection of stamps from Visible Image, 
trust me I have seen them ALL and they are amazing! 

*****************************************************************************


I am partial to a bit of up-cycling as you know. Remember the little chalkboard cum key rack that I modified recently? Blog post HERE Well, this little drawer unit started out quite plain and uninteresting but I have decorated it using the Revolution stamp set from Visible Image. I picked it up in a charity shop and have had it in my stash for a few months now. I suspect the previous owner used it for storing cotton wool balls in as the inside was a little fluffy to say the least! Anyway, after some sanding down and de-fluffing I set about beautifying it.

I started by giving the whole thing a coat of matt varnish, one with a dye included. Not only did it liven up the dull wood but it also gave me a good base to stamp onto. I have found that stamping directly onto wood can be a bit hit and miss. It can sometimes 'bleed' into the grain and you get a blurry image. OK if you want that look but I needed this to be sharp and crisp as the script stamp is so detailed, I wanted to keep it readable!


Once the varnish was dry I stamped the script using black Stazon ink. Although this usually dries very quickly I left it for an hour before doing the next lot of stamping 'just in case'.

Next I stamped some of the decorative elements using black embossing powder. I admit that it didn't work as I wanted it to. It got lost on the background and so I re-stamped the elements this time using gold embossing powder. This turned out to be a good mistake as this gold over black gives a shadow effect which I really like. Lastly I added some red Stazon swirls.


As the piece is decorated with permanent stamp ink and the embossing is technically waterproof, I opted not to give it another coat of varnish. I was worried that there might be a reaction or that the varnish would cause the ink to bleed. It is obviously not a piece I would recommend to be used in any wet, damp rooms, like a bathroom or a kitchen but I would think this would be perfect for a bedroom for your jewellery, or make-up or even cotton wool balls!


Visible Image stamps Revolution


Click HERE to find out how to enter the challenge
This month the theme is Your Favourite Visible Image Stamp.

Click HERE to go to the Facebook group.
Ask to join if you haven't already. 

Click HERE to subscribe to the Newsletter

Click HERE to go to the Visible Image blog to see
DT inspiration projects and check out the Gallery

Click HERE to go to my KimzKrafts Facebook page

See you next week for another Marvellous Monday and in the mean time enjoy your week, get crafty and show us what you have been up to!

Happy Days!  Kim J


Wednesday 19 November 2014

Moo Mania #75 Trees

WOW! I just spent a few hours checking out your blogs from the last challenge. Such amazing work from all of you. Hope you all join in again this time? The theme is TREES and here are my MOOs. You know that I only make original Moos but did you also know that I have an obsession for repetition? I love the production-line way of working and the theme this time was a great opportunity to make a lot of Moos in the same design. Hope you like them?


I started by drawing a tree shape on thick card and after cutting it out I used it to draw round so that each tree was the same shape. I coloured all the elements with Brusho paints in 6 main colours, 3 primary and 3 secondary. I coloured each Moo base and tree and let it dry before splattering and mopping-off the water to give the mottled effect you can see.


I have a good selection of tiny stamps and I spent some time cutting out small leaves. My next task was to put the elements together trying hard not to have the same colour combinations, but I think I may have messed up a bit with the red, green and purple pair in the middle! Oh well, I tried. 


Hope you have time to join in with this new challenge? I know how busy us crafters get in the run up to Christmas and I for one have a mountain of things to make for a craft fayre which I am doing in my village.

See you all again in my blog-hopping, have fun making your project for Moo Mania & More!

Happy Days! Kim

Monday 17 November 2014

Marvellous Monday with Visible Image

Hello all of you out there in blog land! I am so glad to see the back of last week weather-wise. As you know I had a flooded back garden and I am eternally grateful that that is where the water stayed, in the garden! It continued to rain on and off all week up until today (Sunday) when not only has there been moments of blue sky but have also seen dry paving in the garden! I had quite forgotten what colour the paving was! I am thankful for small mercies and have fingers and toes crossed that I can get the back wall cemented up quickly in case it happens again.

On to my project for this week. I know it is coming up to Christmas but I still have a couple more non-Christmas makes to show off. Rumour has it that Mark is working on some new stamp designs for Visible Image, well, it is more than a rumour, I know he is!! I want to show you what I have left in my box of delights before I hit you with a couple of Christmas themed projects and then the new stamp projects otherwise they will never see the light of day!


What I have for you today is another one of those cards made from scraps. I am such a hoarder and any pieces of card left over from Visible Image projects will make their way into a box labelled Visible Image Bits'n'Bobs ready to be rummaged through when I need inspiration. Some pieces will be there for months but I know they will all one day have a purpose! 

The pieces of scrap that I used for this card had been coloured with Brusho paints. They are trimmings from a larger piece of card which were all about 1cm wide. I decided to use these strips to make a plank-like background which was fairly straight forward, I just glued them onto a base card making sure that I kept the neighboring colours as random as possible. I left the piece to dry under a heavy book just to make sure the planks stuck down. I then trimmed this to a neat oblong shape. The resulting background seemed very masculine to me and so I decided to use elements form the Time after Time set. I stamped with bleach using the shattered glass stamp from the set. As I have said before if you are a little nervous about using bleach you could use water and blot away the colour but it will be more subtle. 

AWM Timeaftertime ws2012

I used some of the other stamps from the same set to create the flying fob watch and this is mounted on gel glue to raise it up. The word and number elements are stamped directly onto the planked background. I used black embossing powder to make them more prominent. I also added some hi-lites with a Posca pen. I think it is these hi-lites that make the piece very dynamic and visually exciting.

There we are, what some might call scrap I call inspiration. It is surprising what you can make from off-cuts!

Only mid way through November so still plenty of time to get your project uploaded into the Visible Image challenge, all the details are below.

I look forward to a continuing dry week ahead and hope the weather is good to you where ever you are.


Click HERE to find out how to enter the challenge
This month the theme is Your Favourite Visible Image Stamp

Click HERE to go to the Facebook group.
Ask to join if you haven't already. 

Click HERE to subscribe to the Newsletter

Click HERE to go to the Visible Image blog to see
DT inspiration projects and check out the Gallery

Click HERE to go to my KimzKrafts Facebook page

See you next week for another Marvellous Monday and in the mean time enjoy your week, get crafty and show us what you have been up to!

Happy Days!  Kim J

Monday 10 November 2014

Marvellous Monday with Visible Image

Hello from a very wet and soggy Wales! It has rained here pretty much every day for a week and last Friday saw my back garden turn into a lake! The teeny-tiny-very-insignificant brook at the back of the garden turned into THE MIGHTY MISSISSIPPI and a very small crack high up in the back wall allowed gallons of water in! 


Oh well, things are slowly going back to normal and thankfully the level of water stayed 1 inch below my door step! You can see the tide mark on the wall in the picture. A near miss I would say. On the up side, I now know there is a crack in the garden wall which needs fixing. Once that is done the flooding to the garden shouldn't happen again. 


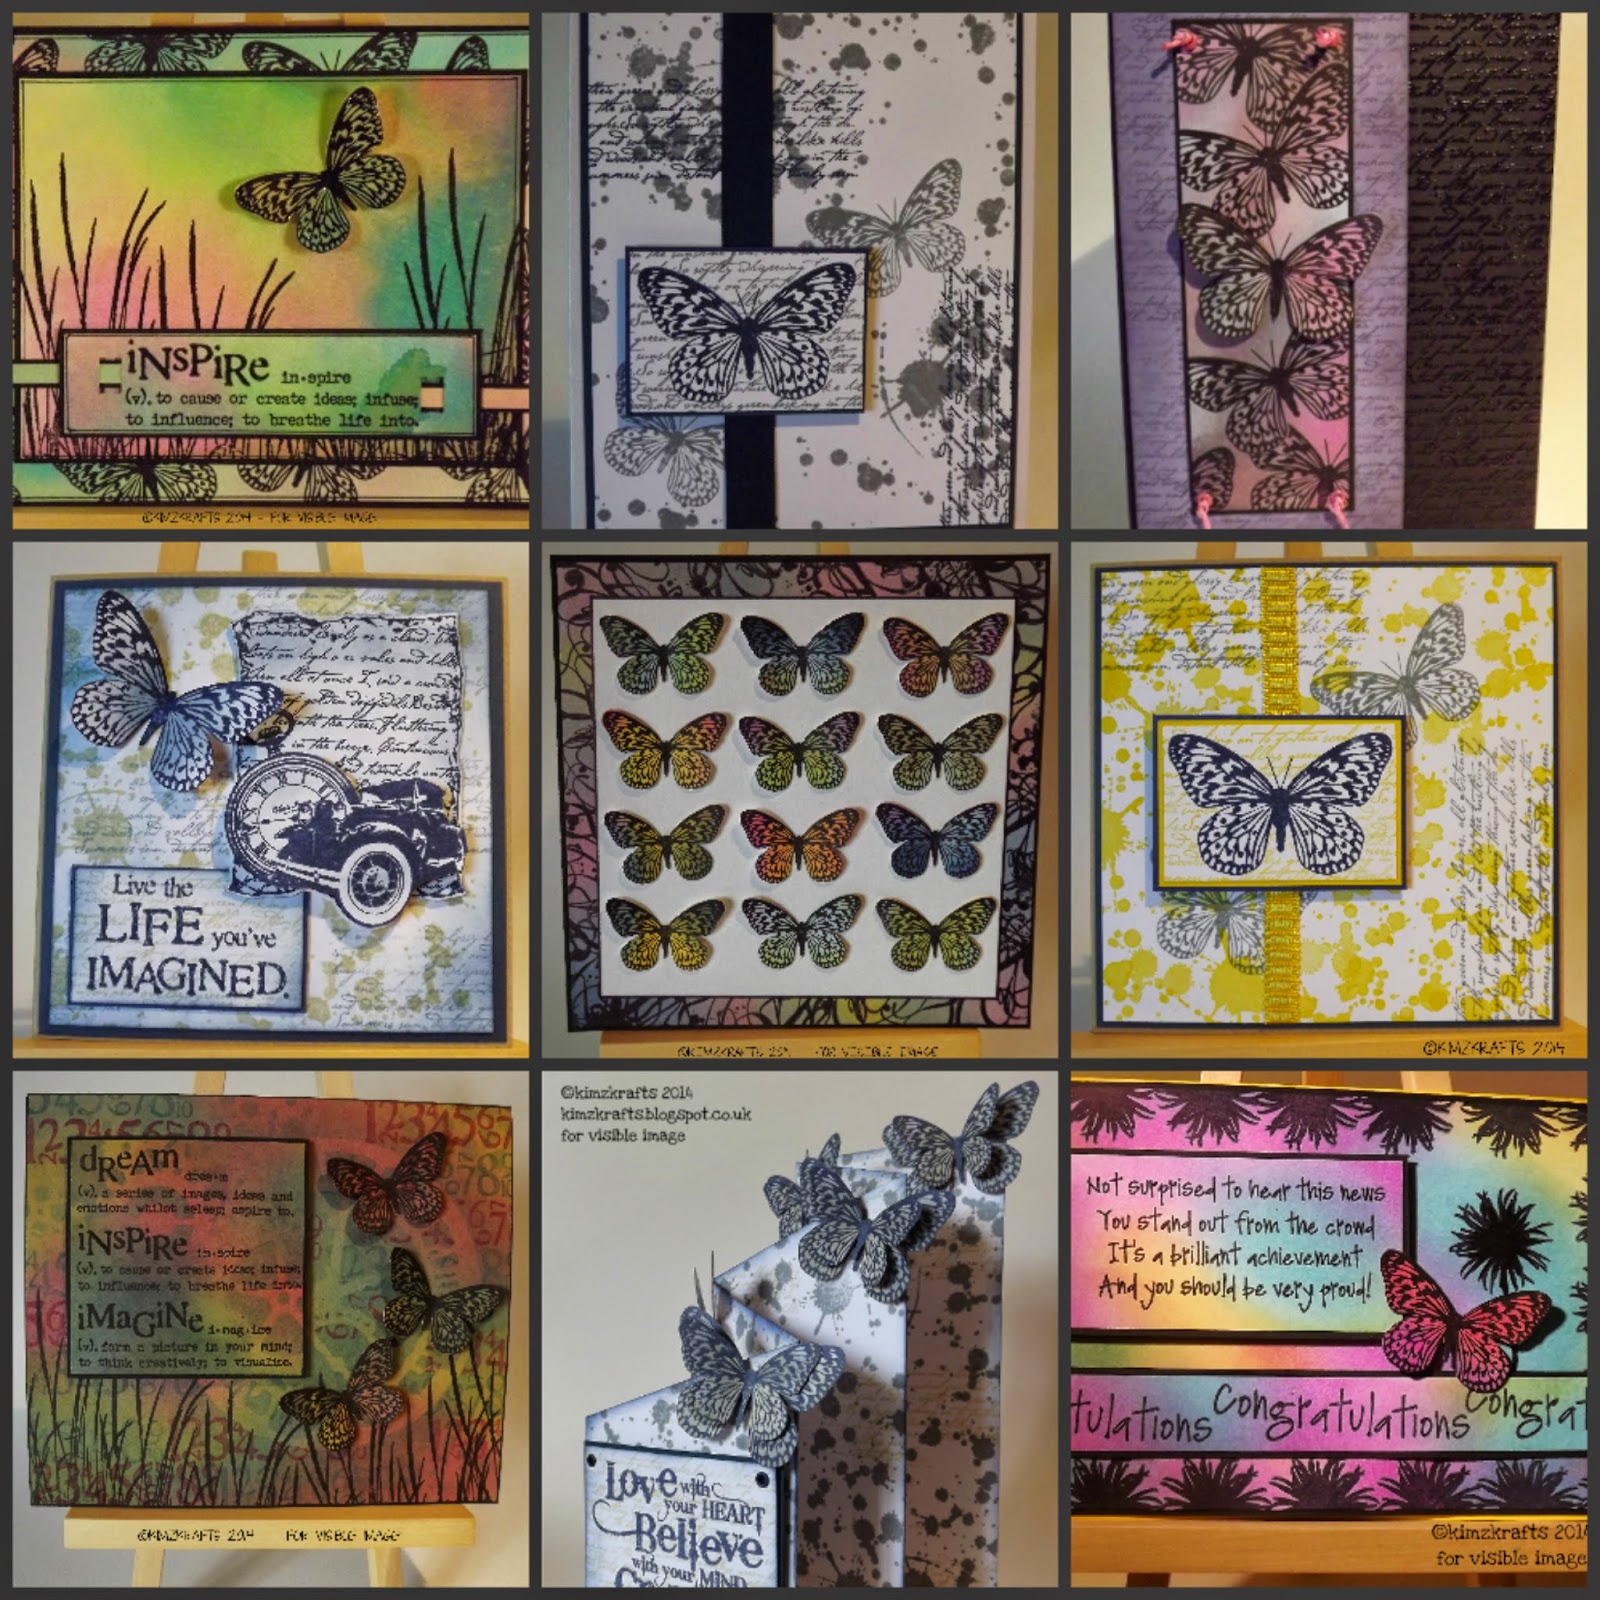
So what do we have in the way of Visible Image treats for you today? Well, if you subscribe to Creative Stamping Magazine you will have already seen this card. One of the great thrills about working for a company like Visible Image is that we are often called upon by our lovely bosses, Helen and Mark, to make projects suitable for inclusion in crafting magazines. This time 6 of us were asked to each create a project using a different stamp and sentiment from the INKognito range. 

I have simply cut'n'pasted the original write-up as I feel the excitement of Friday allows me to be a little lazy! Making a mercy-dash to the local builders merchant in wellies and PJ's to get sand bags at 7:30am is not my idea of fun and I am still getting over it! I expect they are still pretty traumatized by it too!!


·        Take an A3 piece of good quality white card and paint with the Brusho paints. Use a large brush and colour the page dark through to light trying to avoid obvious lines. Blend well and leave to dry.
·        Using just plain water, splash droplets over the card and mop these up fairly promptly. This will give the splatters.
·        Spray the Bronte Script very lightly with a fine mister containing just water. Stamp onto the painted card and promptly blot the excess water off. Again, this will remove some of the paint and leave a light image. Do this all over the card.
·        Allow to dry, or hurry it along with a heat tool.
·        Lightly stamp a few images of the Bronte script in Fired Brick distress ink on the card. It will show more on the lighter areas.
·        Select a piece of the finished background and cut to fit the card base allowing for the layering.
·        Stamp and heat emboss the heart towards the top in the centre of the selected piece of card.
·        On another piece of card stamp and heat emboss the sentiment. See TOP TIPS.
·        Using dilute bleach, (I used a thick one diluted 1 part bleach to 2 parts water) and a fine paintbrush, go around the embossed images to add the highlights. Blot away with kitchen towel if necessary.
·        Mount the main image onto 2 layers, first a white layer then in the burgundy card.  Stick onto the card base.
·        Mount the sentiment onto just a white background. Stick onto card.


Visible Image Heart INKognito stamp  Visible Image These Are The Moments stamp

TOP TIPS
Always make more background card than you need. You can then select the best area and you have leftovers for using in other projects!
When you select a piece of card for the sentiment, try finding a piece that has the opposite colours to the body of the card. This makes the sentiment banner stand out more.
Don't be afraid to use dilute bleach on your projects. It doesn't always make things white again but it does give some lovely results.
Brusho paint sets come with a great leaflet on how to use them.
Brusho paint is very intense and goes a long way. Mix only a small amount of the powder with a drop of water. Use a large brush and plenty of water to get a good blend on the card.

WHY NOT TRY
If you don't fancy using bleach, you get a similar effect using just water and blotting away but the result is more subtle.

TIME TAKEN
Overall 2 hours but this includes drying time which could be less if you used a heat tool to dry the paint.


Click HERE to find out how to enter the challenge
This month the theme is Favourite Visible Image Stamp

Click HERE to go to the Facebook group.
Ask to join if you haven't already. 

Click HERE to subscribe to the Newsletter

Click HERE to go to the Visible Image blog to see
DT inspiration projects and check out the Gallery

Click HERE to go to my KimzKrafts Facebook page

See you next week for another Marvellous Monday and in the mean time enjoy your week, get crafty and show us what you have been up to! 

I am looking forward to a drier, less 'exciting' week ahead.

Happy Days!  Kim J


Wednesday 5 November 2014

Moo Mania & More Challenge #74 Favourite Colour(s)

Well, here we are with another challenge at Moo Mania & More.

As you know I am a traditional Moo maker, I don't venture beyond the original Moo format. No problem with the group evolving and embracing other formats, I just love the challenge of getting all the bits onto the Moo that I can and running with the challenge.

When I saw the theme of Favourite Colour(s) I was at first a bit worried that I wouldn't be able to decide what my favourite colour(s) is/are.

I love all colours! I also have a passion for colour combinations and so I decided to make something with one of my favourite combinations. Naturally this is not the only combination I like either! But a choice had to be made.


I started by using Brusho powder paints to colour a piece of card in my 2 colours, orange and purple. I always make a much bigger piece of background card than I need. Of course for Moo making this isn't hard as the final piece is so tiny! Anyway, this gives me plenty of areas of the card to choose the best bits from. I decided to punch out some circles which I glazed with some good old fashioned Diamond Glaze. I love the contrast between the matt background and the glossy 'buttons'.All finished off with a bit of silver marker pen. 

I hope you are inspired by this Moo and I look forward to seeing your makes over the next 2 weeks. I did visit a lot of blogs this past 2 weeks and was blown away by your projects! I love this group and all it involves, such a creative bunch.

See you again soon, Happy Days! Kim

Monday 3 November 2014

Marvellous Monday with Visible Image

Hello to you all. Welcome to my blog. An especially big welcome to my new followers.

I have been rather housebound these past few days as the weather has been a bit wet here in Wales. Do you know what? I didn't really notice it because I retreated to my Craft Cave and played!

I set myself a little challenge. I seem to have a complete lack of ability when it comes to throwing a piece of paper away! Especially a piece that I have coloured and decorated. And this is basically where the Visible Image inspiration comes from for today. Scraps! Lovely purple scraps no less.


A couple of weeks back I made my first piece using the Revolution stamps. First piece? Yes, if you follow me you will know that I was in the middle of moving house when these stamps were launched. Anyway, as I am always telling you, when you make background paper you need to make more than 'just enough' because there will always be a time when you need just a little bit more to make a tag to match or to cut a piece for a sentiment.

Here is the original card I made.
 So I started by measuring my card base. I took off a little bit to allow for the 'frame' around the 9-piece patch. I then cut my scraps to that size, 9 in total and after playing with the arrangement to get a good contrast at the joins, I stuck then down onto the base card. I then took the stitches from the Sewing Room set and gold embossed stitches along each join and around the edge of the 9-piece patch. Again from the Sewing Room set I stamped a selection of buttons and heat embossed these in gold. I also made a small tag with the sentiment 'Be Unique'. I stitched through the buttons with some embroidery thread and stuck them on with a gel glue to give them some dimension. This arrangement left a little space in the top right corner for a butterfly. I deliberately selected a yellow butterfly as it stood out against the purple background. It is 'unique'.


AWM The Sewing Room ws2012 0 Visible Image Butterfly stamp Visible Image stamps Revolution

My top tip for those days when you don't have hours spare but you fancy doing a bit of crafting is to make some embellishments, like the butterfly, which you can just grab and use when you need something.


And guess what? I have used a butterfly on my challenge inspiration card, so this just goes to prove again that my favourite stamp from Visible Image is most definitely the butterfly! On the 1st November a new challenge was launched and the theme this month is 'Your Favourite Visible Image Stamp(s)'. Here's my inspiration piece just in case you need reminding. The full blog post for this card and the challenge details can be found HERE.


OK, so I am off to the 'Cave' again to play some more. It is a hard life but you know, I'm not going to complain! 

Click HERE to find out how to enter the challenge
This month the theme is
 'Your Favourite Visible Image Stamp(s)'

Click HERE to go to the Facebook group.
Ask to join if you haven't already. 

Click HERE to subscribe to the Newsletter

Click HERE to go to the Visible Image blog to see
DT inspiration projects and check out the Gallery

Click HERE to go to my KimzKrafts Facebook page

See you next week for another Marvellous Monday and in the mean time enjoy your week, get crafty and show us what you have been up to!

Happy Days!  Kim J

Saturday 1 November 2014

November Challenge with Visible Image


Today sees the start of a new challenge over at Visible Image.

The theme this month is 

Your Favourite Visible Image Stamp(s)


I did try and make a choice of my favourite stamp based on just looking through my collection and saying 'this one is nicer than that one' but that really didn't work for me! Like so many of you I simply cannot pick my favourite stamp from all the lovely stamps that Visible Image make. I decided on a new method, the most often used stamp and in some way this does represent my favourite stamp. I use it more than the others, it is so versatile, it hides little blips, it is beautiful alone or in a mass, it can be any colour you want it to be and much more besides. 

I am of course talking about the beautiful BUTTERFLY stamps. Visible Image have made 2 different sizes which is really useful and the patterns on the wings are just right with lots of opportunity for colouring and embossing or both!


My inspiration piece is a simple card made using the flower from the Thank You - More than Words set, the Live Life Now sentiment and of course the Butterfly. 


Just to show you how often I use my favourite stamp, here is a collage of some, by no means all, of the cards I have made featuring either the large or the small butterfly. As you can see, the butterfly is a very versatile stamp indeed. Where would I be without it?

0 Visible Image Butterfly stamp
The stamps I used for the Inspiration Piece
Click to Link to the online shop

Thank You Set Visible Image Live Life Now stamp 


So there we are, I got there in the end! Rather than me finding my favourite stamp, I think my favourite stamp found me! 


Click HERE to find out how to enter the challenge

Click HERE to go to the Facebook group.
Ask to join if you haven't already. 

Click HERE to subscribe to the Newsletter

Click HERE to go to the Visible Image blog to see
DT inspiration projects and check out the Gallery

Click HERE to go to my KimzKrafts Facebook page

See you soon for Marvellous Monday and in the mean time enjoy your week, get crafty and show us what you have been up to!

Happy Days! Kim


Monday 27 October 2014

Marvellous Monday with Visible Image

Marvellous Monday again and it is good to see you here. Welcome to my new followers. As you know Monday is my day to inspire you with a project made using the amazing stamps from Visible Image.

It never ceases to amaze me just how great these stamps are. They are made from top quality polymer, are deeply etched and produce superb images time after time.


The guys at Visible Image, Mark and Helen, do an awesome job with Mark doing the design work and stamp making and Helen running the media and office side. Helen also writes the beautiful verses. They both work really hard to bring us these wonderful stamps. Have you met them at one of the shows? They always have a great stand displaying lots of samples the DT have made including some of mine! They always thank us for our work but they also need to be thanked for producing such wonderful stamps. It is a bit like the chicken and the egg, without one you couldn't have the other! 

My project today is a tag made using the butterfly and one of the floral silhouette More than Words sets, Thinking of You. 

I recently did a card and tag for Craft Stamper magazine which is where the idea for this tag came from. I started by cutting a tag which was large enough to accommodate three flower heads. Odd numbers always work best for some reason.  If you look closely you will see that this isn't a blue tag over a white tag, it is in fact just one tag. I used masking tape to keep the top, left and bottom of the tag white. I used Gentle Blends in Denim to add heavy colouration to the left side of the tag and blending out to nothing towards the right side. Once the base was completely dry I carefully removed the masking tape and used a jet black archival ink to stamp the images. The steams are separate so you can bend them to give them a more natural look. I stamped the main sentiment down the right hand side.

I coloured a small piece of white card with the Denim Gentle Blends. Once dry I stamped the butterfly again in black and cut it out. I took a white paint pen by Posca to add highlights to the flowers and to the butterfly. A piece of white paper ribbon finished off the tag.


Thinking Of You 0 Visible Image Butterfly stamp


Click HERE to find out how to enter the challenge
The theme for October is Get Spooky! 

Click HERE to go to the Facebook group. Ask to join if you haven't already. 
Hear all about new releases, enter competitions and chat with other Visible Image fans and DT Members

Click HERE to subscribe to the Newsletter

Click HERE to go to the Visible image blog to see all the other 
DT inspiration projects for this month. 

Click HERE to go to my KimzKrafts Facebook page

Right, I must away! I have a heap of things to do, mostly domestic chores but once they are out of the way I shall retreat to my cave and get crafty! Not long till the new Challenge is announced!

Happy Days!! Kim